Skip to content
  • Knowledge Base
  • Clever IT
  • Knowledge Base
  • Clever IT
Facebook-f Twitter

Android

  • Add a shared mailbox to Outlook mobile
  • Add an email account to Outlook on Android

iCloud

  • Sign out of iCloud on your Mac

iOS

  • Set up the Outlook app for iOS
  • Add a shared mailbox to Outlook mobile
  • How to forget a Wi-Fi network on your iPhone, iPad, iPod touch, or Mac
  • Take a screenshot on your iPhone

macOS

  • Automatically mount network share on startup with Mac OS X
  • Back up your Mac with Time Machine
  • Sign out of iCloud on your Mac
  • How to forget a Wi-Fi network on your iPhone, iPad, iPod touch, or Mac
  • Move your content to a new Mac
  • Move your data from a Windows PC to a Mac
  • Restore your Mac from a backup

Microsoft 365

  • Download printer drivers in Windows – Microsoft Support
  • Set up your Microsoft 365 sign-in for multi-factor authentication
  • Change your two-step verification method and settings

Office 365

  • Activate Office

OneDrive

  • Save disk space with OneDrive Files On-Demand for Windows – Microsoft Support
  • Share OneDrive files and folders

Outlook 365

  • Set up the Outlook app for iOS
  • Add recipients of my email messages to the Safe Senders List
  • Open and use a shared mailbox in Outlook on the web

Outlook for Mac

  • Open a shared Mail, Calendar or People folder in Outlook for Mac
  • Add an email account to Outlook for Mac

Sharepoint

  • Share OneDrive files and folders

Synology

  • Setup Synology Drive Client

TruGrid

  • TruGrid – Initial User Setup

Windows

  • Install a printer in Windows – Microsoft Support
  • Setting up a wireless network in Windows – Microsoft Support
  • How to use the PC Health Check app – Microsoft Support
  • Keyboard shortcuts in apps – Microsoft Support
  • Solve PC problems over a remote connection – Microsoft Support
  • Help protect my PC with Microsoft Defender Offline – Microsoft Support
  • Virus & threat protection in Windows Security – Microsoft Support
  • Stay protected with Windows Security – Microsoft Support
  • What is TPM? – Microsoft Support
  • Update drivers manually in Windows – Microsoft Support
  • Change the Windows regional settings
  • Windows 11 System Requirements
  • Add an email account to New Outlook
  • Add an email account to Classic Outlook

Windows 10

  • Configure Windows Hello
  • Use the On-Screen Keyboard (OSK) to type – Microsoft Support
  • Make your mouse, keyboard, and other input devices easier to use – Microsoft Support
  • Troubleshoot problems updating Windows – Microsoft Support
  • Make it easier to focus on tasks – Microsoft Support
  • Get to know the touch keyboard – Microsoft Support
  • Troubleshoot problems updating Windows – Microsoft Support
  • Troubleshoot problems updating Windows – Microsoft Support
  • Fix printer connection and printing problems in Windows – Microsoft Support
  • Enable text suggestions in Windows – Microsoft Support
  • Install a printer in Windows – Microsoft Support
  • Setting up a wireless network in Windows – Microsoft Support
  • How to use the PC Health Check app – Microsoft Support
  • Keyboard shortcuts in apps – Microsoft Support
  • Solve PC problems over a remote connection – Microsoft Support
  • Enable TPM 2.0 on your PC – Microsoft Support
  • Help protect my PC with Microsoft Defender Offline – Microsoft Support
  • Virus & threat protection in Windows Security – Microsoft Support
  • Stay protected with Windows Security – Microsoft Support
  • What is TPM? – Microsoft Support
  • Update drivers manually in Windows – Microsoft Support
  • How to use multiple monitors in Windows – Microsoft Support
  • Change the Windows regional settings
  • Fix Bluetooth problems in Windows 10
  • How to use the taskbar in Windows 10
  • Keyboard shortcuts in Windows 10
  • Back up your BitLocker recovery key

Windows 11

  • Configure Windows Hello
  • Enable text suggestions in Windows – Microsoft Support
  • Make it easier to focus on tasks – Microsoft Support
  • Get to know the touch keyboard – Microsoft Support
  • Make your mouse, keyboard, and other input devices easier to use – Microsoft Support
  • Use the On-Screen Keyboard (OSK) to type – Microsoft Support
  • Touch gestures for Windows – Microsoft Support
  • Use text or visual alternative to sounds – Microsoft Support
  • Make Windows easier to hear – Microsoft Support
  • Get started with eye control in Windows – Microsoft Support
  • Use voice typing to talk instead of type on your PC – Microsoft Support
  • Use color filters in Windows – Microsoft Support
  • Complete guide to Narrator – Microsoft Support
  • Change color contrast in Windows – Microsoft Support
  • Use Magnifier to make things on the screen easier to see – Microsoft Support
  • Make Windows easier to see – Microsoft Support
  • Free up drive space in Windows – Microsoft Support
  • Back up your Windows PC – Microsoft Support
  • Windows location service and privacy – Microsoft Support
  • Windows keyboard shortcuts for accessibility – Microsoft Support
  • Use your Windows PC as a mobile hotspot – Microsoft Support
  • Metered connections in Windows – Microsoft Support
  • Cellular settings in Windows – Microsoft Support
  • Connect to a VPN in Windows – Microsoft Support
  • Change TCP/IP settings – Microsoft Support
  • Fix Ethernet connection problems in Windows – Microsoft Support
  • Fix Wi-Fi connection issues in Windows – Microsoft Support
  • Connect to a Wi-Fi network in Windows – Microsoft Support
  • Set your display for night time in Windows – Microsoft Support
  • Fix printer connection and printing problems in Windows – Microsoft Support
  • Download printer drivers in Windows – Microsoft Support
  • How to download and install the latest printer drivers – Microsoft Support
  • Send files over Bluetooth in Windows – Microsoft Support
  • Pair a Bluetooth device in Windows – Microsoft Support
  • Reinstall Windows – Microsoft Support
  • Install a printer in Windows – Microsoft Support
  • Setting up a wireless network in Windows – Microsoft Support
  • Stay up to date with widgets – Microsoft Support
  • How to use the PC Health Check app – Microsoft Support
  • Change caption settings – Microsoft Support
  • Use live captions to better understand audio – Microsoft Support
  • Keyboard shortcuts in apps – Microsoft Support
  • Solve PC problems over a remote connection – Microsoft Support
  • Getting ready for the Windows 11 upgrade – Microsoft Support
  • Windows 11 and Secure Boot – Microsoft Support
  • Help protect my PC with Microsoft Defender Offline – Microsoft Support
  • Virus & threat protection in Windows Security – Microsoft Support
  • Stay protected with Windows Security – Microsoft Support
  • What is TPM? – Microsoft Support
  • Update drivers manually in Windows – Microsoft Support
  • How to use multiple monitors in Windows – Microsoft Support
  • Use voice access to control your PC & author text with your voice – Microsoft Support
  • Reset or reinstall Windows – Microsoft Support
  • Turn on device encryption – Microsoft Support
  • Get connected when setting up your Windows 11 PC – Microsoft Support
  • Change the Windows regional settings
  • Windows 11 System Requirements
  • Fix Bluetooth problems in Windows 11
  • How to use the PC Health Check app in Windows 11
  • Back up your BitLocker recovery key
  • Keyboard shortcuts in Windows 11
  • How to use the taskbar in Windows 11
View Categories
  • Home
  • Docs
  • Synology
  • Setup Synology Drive Client

Setup Synology Drive Client

4 min read

It’s important that Synology Drive has already been set up on the Synology NAS you will be connecting to. The steps below do not cover that required pre-requisite.

Step 1 #

Download Synology Drive Client #

Visit https://www.synology.com/en-us/support/download/DS1813+?version=7.0#utilities to get a list of Synology desktop utilities. Find the Synology Drive Client and click Download.

Step 2 #

Install Synology Drive Client #

Run the downloaded installer file. The installation has no specific settings or requirements other than choosing to Run the client after it finishes.

Step 3 #

Configure Synology Drive Client #

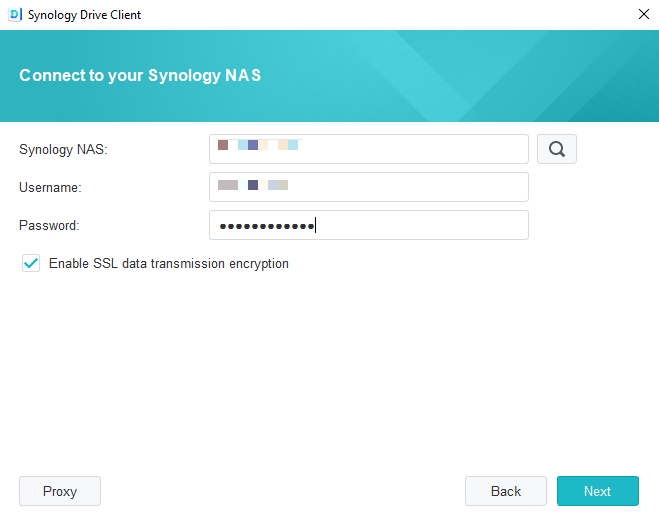
Once the client has opened, click Start Now to begin the configuration wizard. For the Synology NAS field, put in either the externally accessible hostname or IP, the internally accessible hostname or IP (if the client does not require external connectivity), or the Synology QuickConnect ID. Add the Username and Password of the end-users server login in the respective fields and click Next.

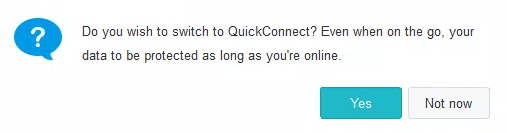
If the client detects that QuickConnect is enabled on the server, it may prompt you to switch to the QuickConnect ID. This is optional, but can be useful if the user ever intends on using the Drive Client on an external network.

Step 4 #

Setup Sync Task #

The configuration wizard will now give you two options: Sync Task or Backup Task. Select Sync Task to continue. Click Change next to the first field titled Folder to sync from your NAS and select the folder you want to sync to this device. Shared folders will be shown under Team Folder and home folders will be shown as My Drive.

While the folder location can remain as is, it’s generally advisable to change it. The reason for this is that the root folder of c:\Users\<user>\SynologyDrive is quite long and will add to any character limits in windows. When changing it, be sure to deselect Create an empty “SynologyDrive” folder in whatever root folder you choose. If you choose c:\Users\<user>\Public as the root folder, for example, and the shared folder name is Public, the folder where the synced files are kept will be c:\Users\<user>\Public. Make sure to use an empty and newly created root folder and consider using the company name or abbreviated version as the root folder so the user knows those files belong to the company (for example, c:\Users\<user>\ACME\Public).

Before clicking Done, you need to make a decision regarding the Enable On-demand Sync option. In most cases, this should be left enabled. But, if the user has poor internet connectivity or travels a lot, they may wish to have the files available even when working offline. Unchecking this will cause the client to download local copies of all the files immediately, whereas leaving it enabled will instruct the client to only download files when a user attempts to open them.

Step 5 #

Add Additional Folder #

To add an additional folder to an already existing sync profile, open the Synology Drive Client and click the + Create button under the Sync Tasks section. Leave the default selection in place for the existing and already setup connection.  Click Change next to the first field titled Folder to sync from your NAS and select the folder you want to sync to this device.

As indicated in Step 4, while the folder location can remain as is, it’s generally advisable to change it. In most cases, you will want to match the root folder that was created in Step 4 or previously exists for other tasks. For example, the already existing tasks may have c:\Users\<user>\ACME\ as a root folder, assuming the company name is ACME. If the new folder is the user’s Home folder, for example, you may want to use c:\Users\<user>\ACME\Home.

Before clicking Done, you need to make a decision regarding the Enable On-demand Sync option. In most cases, this should be left enabled. But, if the user has poor internet connectivity or travels a lot, they may wish to have the files available even when working offline. Unchecking this will cause the client to download local copies of all the files immediately, whereas leaving it enabled will instruct the client to only download files when a user attempts to open them.

Updated on June 23, 2024
Table of Contents
  • Step 1
    • Download Synology Drive Client
  • Step 2
    • Install Synology Drive Client
  • Step 3
    • Configure Synology Drive Client
  • Step 4
    • Setup Sync Task
  • Step 5
    • Add Additional Folder

Empowering Calgary with Innovative IT Solutions – Clever IT: Your Partner in Cutting-Edge Technology and Exceptional Service.

Facebook-f Twitter
Quick Links
  • Knowledge Base
  • Clever IT
  • Knowledge Base
  • Clever IT

© Clever IT 2025 All Rights Reserved